Overview
Ouch! No one likes being sidelined by an injury. But you can cope with some by doing certain rehabilitative exercises (depending on your injury and if your doctor gives you the OK, of course). While these exercises won’t heal your injury, they can make you feel stronger. So if you’re experiencing pain in your knees, shoulders, lower back or hips, follow along with these 13 exercises from Melanie Archer, certified Pilates Master Trainer and owner of Archer Pilates and Wellness in Los Angeles. (NOTE: Get approval from your doctor or physical therapist before doing any of these exercises, as not all of them are suitable for every single injury.)
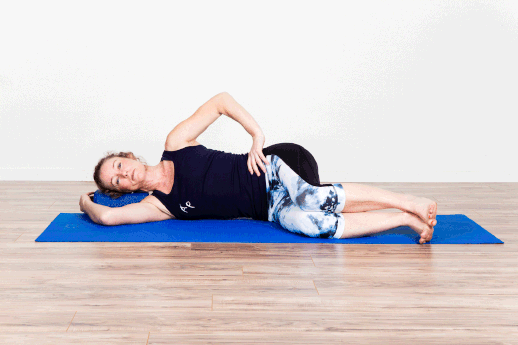
Knee Injuries: Single-Leg IT Band Stretch
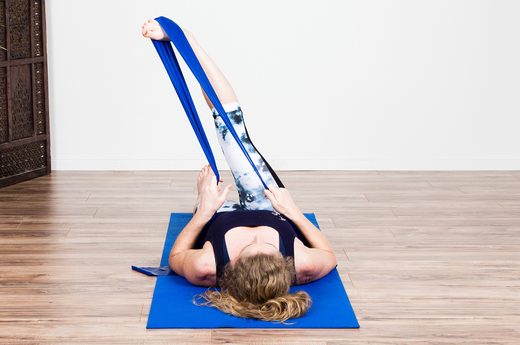
Does your workout involve a lot of pounding the pavement, jumping or bouncing? Then the cartilage in your knees is getting a lot of wear and tear. Stretch your IT band to counteract this. HOW TO DO IT: Lie face up on the floor and wrap a resistance band around your foot. Hold the ends of the band with the opposite hand. Extend your leg out straight. Rotate the big toe inward and stretch the leg across your body as far as you can without bending the leg or lifting the hip. Breathe four long, deep, steady inhalations and exhalations. Slowly release and switch legs. ALSO GOOD FOR: Bursitis in the hip, arthritis in the knee, meniscus tear, mild ACL or PCL strain (with doctor approval).
Knee Injuries: Standing VMO Contractions
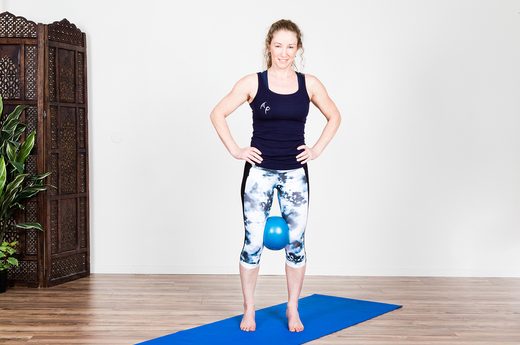
You may have never heard of your VMO, but it’s vital for helping to relieve knee pain. Your VMO (vastus medialis oblique) is located above the knee on the front inner part of your quads, says Archer. And its main function is to straighten the leg while stabilizing the knee caps. HOW TO DO IT: Stand with feet hip-distance apart, heels slightly lifted and knees slightly bent. Place a small ball between your knees, contract the VMO muscles and hold for 10 seconds. You‘ll know you’re doing it properly when you can feel the muscles pressing inward or into the ball. Repeat 10 times. ALSO GOOD FOR: Bursitis in the hip, meniscus tear, arthritis in the knee and other knee injuries.
Knee Injuries: Standing Releve Pulses
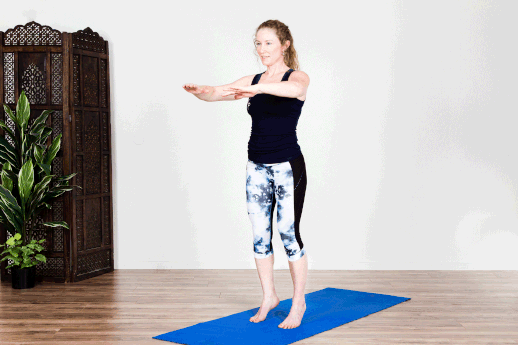
Here’s another great exercise for the good ol’ VMO. To strengthen this muscle, Archer likes to do a series of isometric, or small-movement, exercises. HOW TO DO IT: Stand on the balls of your feet with heels slightly lifted and knees slightly bent. Place a ball between the inner thighs or go without. Use a wall for stability if necessary. Contract the VMO muscles and slowly pulse up and down an inch. The move is very small and slow to allow your brain to check in with the muscles you’re trying to contract. Do 10 to 20 pulses and rest. ALSO GOOD FOR: Calves, quads, glutes and ankles.
Knee Injuries: VMO Stability-Ball Press

Once again, small movements are the name of the game when it comes to rehab exercises. You don’t want to push your muscles too hard too quickly. So even though this might not look or seem like much, rebuilding the strength in your knee takes time. HOW TO DO IT: You can do this exercise sitting in a chair if necessary, but standing is ideal. Standing with stability ball in front of you, place one foot on the surface and, with a very slight bend in the knee, gently press down on the ball. If the standing leg grows tired, try softening that knee or just take a seat. Do three sets of 10 presses. ALSO GOOD FOR: Calves, quads and hip flexors.
Knee Injuries: Stability-Ball Baby Hamstring Curls
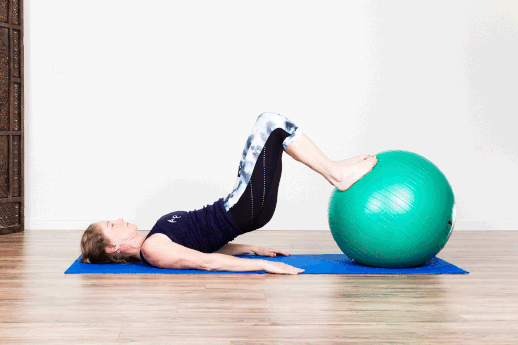
Bridging hamstring curls are perfect for rehabbing a knee injury, but they can be too aggressive on a gym bench or machine. For these situations, Archer suggests baby hamstring curls on a stability ball. HOW TO DO IT: Lie on your back on the floor with a stability ball near your butt. Keeping your tailbone down, place your feet hip-distance apart on the ball. Place your arms along your sides with your palms pressing into the floor and your shoulder blades down your back. Gently curl up to a bridge position at least two inches off the floor. Keep the hips level with each other as you roll the ball an inch or two back and forth. ALSO GOOD FOR: Calves and quads.
Knee Injuries: Glute Bridge Pelvic Tilts
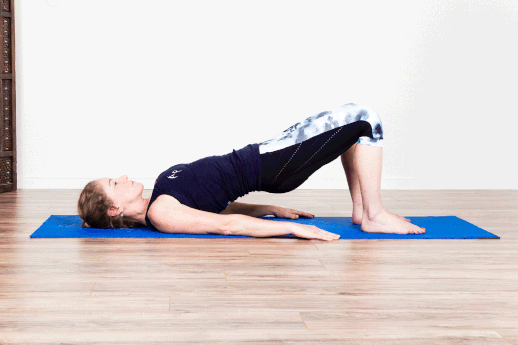
Anyone with a knee injury wants a good lower-body exercise that won’t put extra stress on the knees. Enter this glute bridge variation. HOW TO DO IT: Lie on your back with your feet hip-distance apart, knees bent and pointing toward the ceiling and heels directly under the knees. Your arms should be down along your sides and your palms should be pressing into the floor. Keeping the hips level with each other, lift up into a bridge (only as high as you can without feeling pressure in the knees). Tilt the pelvic bone slightly up and toward your belly button and back to neutral. Do this tilt 10 times before lowering all the way down one vertebra at a time. Do one to three sets.
Lower-Back Pain: Stability-Ball Back Extension
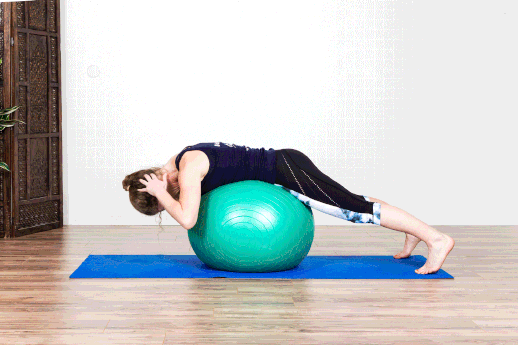
Lower-back pain is a surefire sign of an unbalanced workout. “But clients who strengthen the low-back muscles see a dramatic reduction in low-back pain,” says Archer. (NOTE: Don’t do this exercise if you have disc herniation or a bulging disc in the lumbar spine.) HOW TO DO IT: Start either on your knees (with a smaller stability ball) or on your feet. With a stability ball in front of you, come into a plank on the ball, belly and chest lying on the ball. Bring the fingertips to your neck and elbows out to the sides. Use your abs to lift your chest off the ball. Keep the neck in line with the spine, and don’t hyperextend or arch it. Do one to three sets of 10 to 15 reps. ALSO GOOD FOR: Glutes, upper back muscles, rhomboids, lattisimus dorsi (lat muscles) and abdominals.
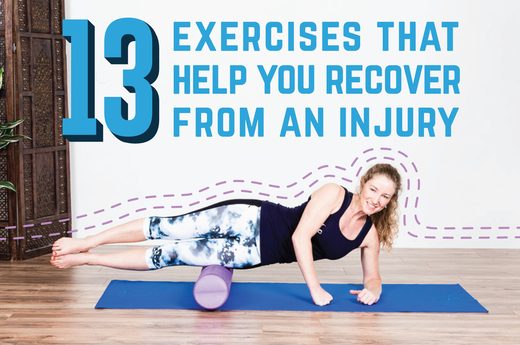
Joint Pain: Foam Rolling
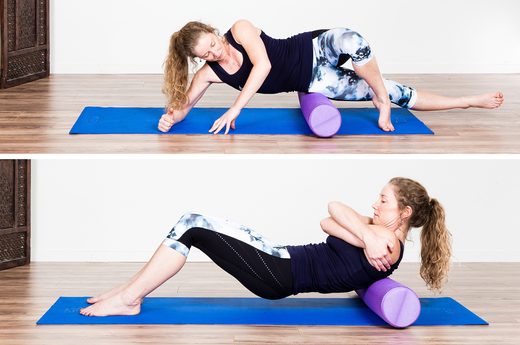
Joint injuries are all too common (and very tricky to exercise around). To help, Archer likes to loosen the muscles and tendons with a foam roller. “The trick is to move slowly and to stay put for a moment when you reach a particularly tense spot.” HOW TO DO IT: To target your hips (and relieve knee pain), start in a side plank and support your upper body on your forearm. Bring the top leg’s foot down to the floor for more support. Starting with your hip on the roller, roll over the IT band from your hip to just above your knee. Switch sides. To target your shoulder blades and upper back, sit on the floor with the roller behind your back, feet flat on the floor and knees bent. Wrap your arms around your torso and lie back on the roller. Roll back and forth with the roller between the shoulder blades.
Shoulder Pain: Resistance-Band Pull-Apart
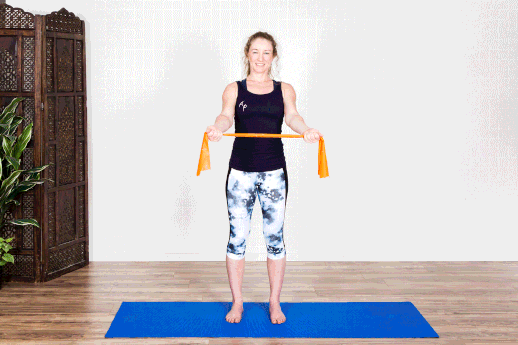
Got shoulder pain? Your rotator cuff is the mostly likely culprit, according to research in the Asian Journal of Sports Medicine. The same study concluded that exercise therapy was extremely effective for improving pain and function, even with a total tear. HOW TO DO IT: Hold a resistance band with both hands about a foot apart (wider to decrease intensity). With your palms facing either the ceiling or turned in toward each other, lift the band to chest height with a slight bend in the elbows. Slowly stretch the band so the hands stay on a level plane, and actively resist as the band comes back together. If this feels too easy, move the hands closer together at the start. Do 10 reps. ALSO GOOD FOR: Lattisimus dorsi, biceps, trapezius and rhomboids.
Rotator Cuff Injuries: Close the Book
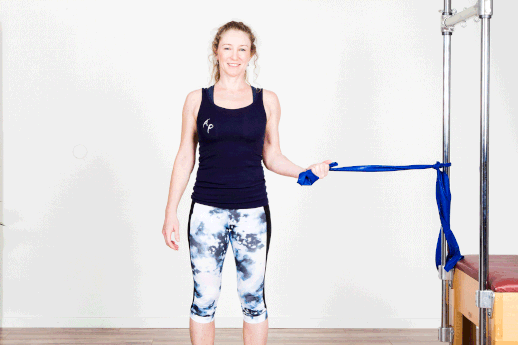
Recovering from a rotator cuff injury can take some serious time and TLC. When this group of tendons in the shoulder is in pain, your upper body activity is extremely limited. This exercise targets the internal rotators and can be easily dialed down for those with serious pain, says Archer. HOW TO DO IT: Tie one end of a resistance band to something sturdy at waist height. Stand with the attachment point at your left side and hold the band in your left hand. Begin with your elbow close to your waist, and your hand in front of the elbow. Stretch the band across your belly and actively resist back to the starting position. Do 10 reps and switch sides. ALSO GOOD FOR: Lattisimus dorsi, biceps, trapezius (upper back) and rhomboids.
Rotator Cuff Injuries: Resistance-Band Walk-Away
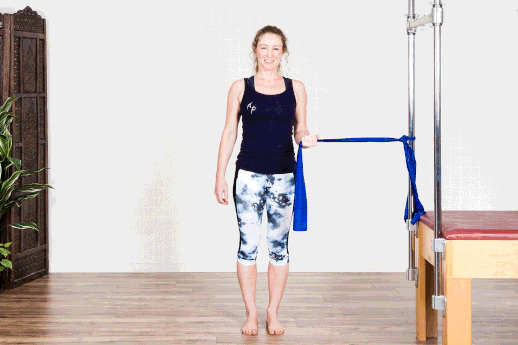
Shoulder injuries are one serious upper-body workout roadblock. One of the moves Archer suggests for people with any degree of shoulder pain is the resistance-band walk-away. “It’s highly customizable, depending on your degree of pain or injury,” she says. “The isometric hold will help stabilize and work to strengthen all of the muscles in the region.” HOW TO DO IT: Tie one end of a resistance band to something sturdy. Stand (or kneel) with your left side next to the band and with the band in your left hand. Begin with your elbow close to your waist and your hand in front of the elbow. Side step away from the band’s attachment point. Repeat a few times, as long as you can handle the resistance. Switch sides and repeat on both sides for three sets. ALSO GOOD FOR: Lattisimus dorsi, biceps, trapezius and rhomboids.
Hip Injuries: Bridging Inner-Thigh Pulses
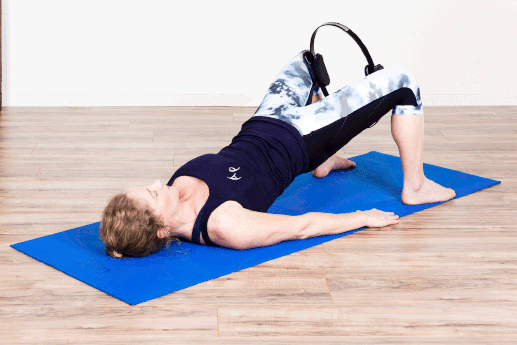
HIIT is a great way to get a heart-pounding workout in a short time. But with the increased intensity comes an increased risk of injury. Tendinitis and bursitis (when tendons become inflamed from overuse) are the two most common. If either happens, Archer suggests this exercise to help strengthen the hip muscles and relieve pain. HOW TO DO IT: Lie on your back with your legs bent and your feet hip-width apart and flat on the floor. Press down through the feet and raise your butt off the ground. Place the Pilates ring between the inner thighs. Slowly squeeze and release the ring or ball. Do this 10 times, and then slowly lower your spine down toward the floor. Repeat up to three times. ALSO GOOD FOR: Abdominal muscles, pelvic floor muscles, hamstrings, inner thighs and lower-back muscles.
Hip Injuries: Baby Fire Hydrant
Hip injuries don’t have to knock you out of the fitness game completely. Unless under strict doctor‘s orders to the contrary, “there is no reason not to keep moving and get blood circulating through the area," says Archer. "This only helps speed recovery or relief.” HOW TO DO IT: Lie down on your side with the pelvis stacked vertically and legs bent at a 90-degree angle. Contract the abdominals and use your body’s own resistance to open and close the legs. Lift the top leg off, keeping the L shape. Keep your muscles engaged as you lift and lower the top leg. Do three sets of 10 reps (if you can) on each side. As you get stronger you can add a resistance band around the thighs if cleared by your doctor.
What Do YOU Think?
Have you ever been sidelined by an injury? What exercises and stretches did your doctor or physical therapist give you to help your rehab process? Have you ever done any of these? Which ones are your favorites? Which ones would you add to the list? Share your stories and suggestions in the comments section below!
Note – This information has been taken from different internet sources.